There's no doubt that when it comes to full-stack React frameworks, Vercel's Next.js is what comes to our mind first. Next.js is a very well-made framework used by a large majority of React developers to build powerful React apps without missing out on stuff like search engine optimization and serverless functions.
Recently, I've been asked by Fiber's project lead to deploy the project's website to GitHub Pages instead of Netlify. Since this website is fully static, it's a matter of creating a static export and using GitHub Actions for CI/CD.
Overview
For a very long time, Next.js was the go-to framework for server-side rendered React applications, but today it's much more than that. It introduces the concept of hybrid app development where you can combine the benefits and uses of multiple build strategies. Here's a quick overview of the types of practices that you can combine with Next.js:
λ Lambda (serverless) functions
These are functions that reside under the /api route of a Next.js app as well as other routes that require fetching initial props from somewhere (using getInitialProps or getServerSideProps). You can use them to create functions that will be executed during runtime (e.g.: API routes for fetching data from or writing to a database or to server-side render the data that will be displayed on a page).
○ Static HTML
These pages do not have any initial props and they can be safely rendered as static HTML files. It's mostly used for pages that do not have any dynamic content (i.e. the page component is always the same).
● Static Site Generation (SSG)
Earlier this year, Next.js added static site generation as one of the build options. These pages use the getStaticProps method to fetch the data that will be used to generate static HTML files, as well as getStaticPaths to get a list of all the subroutes that need to be generated as HTML files (e.g.: a list of blog posts). The difference between SSG and server-side rendered lambda pages is that while the latter will only build a single route that will update from the server side, SSG will generate a static HTML page for every possible combination of data that you provide to it.
Incremental Static Regeneration (ISR)
This is the latest build type introduced in Next.js. It combines the benefits of server-side rendered pages and SSG by generating static HTML files on runtime. You can see a demo for how this works here.
Creating and Deploying a Static Site to GitHub Pages
Now that we know the types of rendering Next.js can do, we can jump right into how to deploy our static site to GitHub Pages. Thanks to Next.js' awesome static site generation abilities and GitHub Actions, this process shouldn't take more than 10 minutes.
In this example, we will deploy to the gh-pages branch of the same repo where our website's source code resides. You can, however, use the same steps to deploy the website to another repo or branch.
Step 1: Export Your App
The first step is to generate a static build of your Next.js site. I think this should go without saying but nothing that has to run on a Node.js server (such as lambda functions and getServerSideProps) can be rendered to static HTML (this includes incremental static regeneration). You may want to use getStaticProps and getStaticPaths if you have dynamic data that can be generated during build time.
If you heavily depend on server-side features, I recommend deploying your app to a platform that supports lambda functions, such as Vercel.
To export your app, you have to run the following commands:
next build && next exportTo make things easier, you can add this to your scripts in your package.json (I highly recommend doing this):
"scripts": {
  "build": "next build && next export"
}
and then run it using the following command:
npm run buildThis will create a directory called out which contains a fully static version of your website. You will have to deploy the contents of this directory to GitHub Pages.
Obviously, creating new commits for the out directory and pushing them manually to the gh-pages branch is a very tedious task, so we need to automate this somehow. Here's where GitHub Actions comes into action (pun intended).
Step 2: Setting Up GitHub Actions
The very first step is to create a personal access token so that the GitHub Actions runner can authenticate and push the commits to our gh-pages branch.
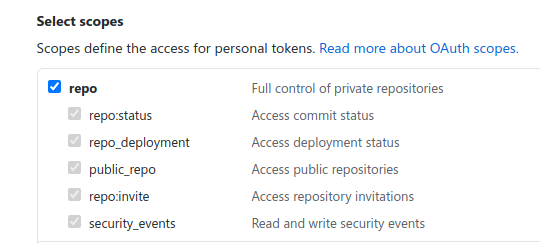
Head over to GitHub's settings and create an access token with the repo scopes:
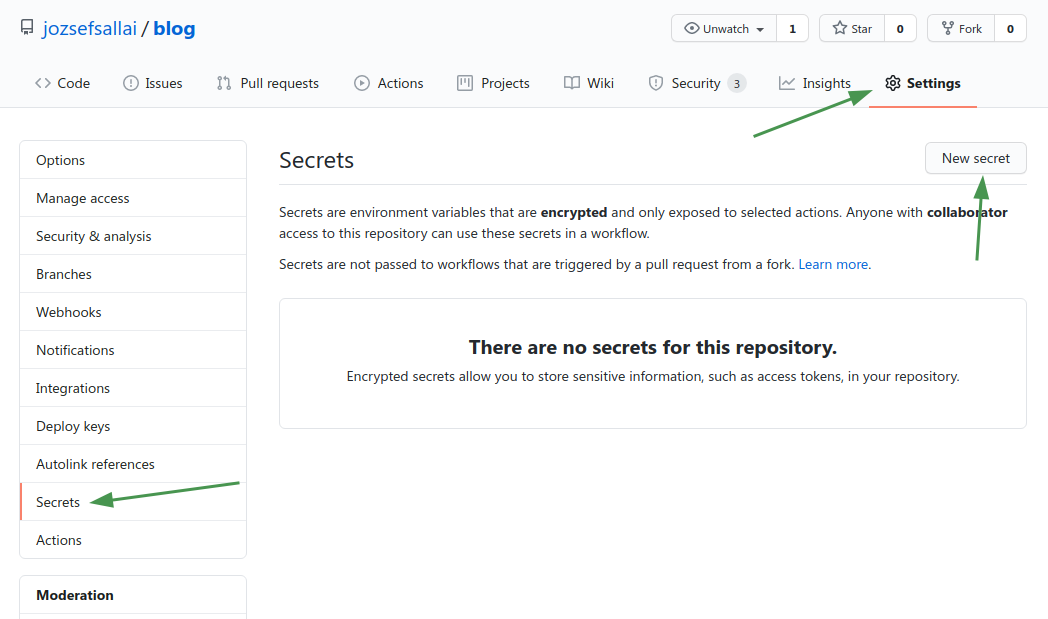
Once you've created the token, copy it and create a new secret called ACCESS_TOKEN in the settings of your repository:
Once you're done with that, you can create a new GitHub Actions workflow in your repository. Create a directory called .github/workflows and inside that directory, create a YAML file with the following contents:
name: Build and Deploy
on:
  push:
    branches:
      - master
jobs:
  build-and-deploy:
    runs-on: ubuntu-latest
    steps:
      - name: Checkout
        uses: actions/checkout@v2.3.1
        with:
          persist-credentials: false

      - name: Build
        run: |
          npm ci
          npm run build

      - name: Deploy
        uses: JamesIves/github-pages-deploy-action@3.6.1
        with:
          GITHUB_TOKEN: ${{ secrets.ACCESS_TOKEN }}
          BRANCH: gh-pages
          FOLDER: out
          CLEAN: true
Here's how the action works:
It executes on every push to the
masterbranch. If your code is in a different branch, make sure to edit this part.It checks out the repository in the container without persisting credentials (this is necessary for the deployment to work).
It builds a static version of our site using the
npm run buildscript.Using an action called Deploy to GitHub Actions, it will use your token to create and push a clean commit to the
gh-pagesrepo from theoutdirectory that got generated. If the branch doesn't exist, it will create it.
Step 3: Enable GitHub Pages
Before you actually do that, there's a mini-step that you need to perform to ensure that your site will look and work correctly. GitHub Pages uses Jekyll under the hood to host and render static sites. However, Jekyll ignores every directory that starts with an underscore character. This will be a problem because Next.js generates the static assets (CSS and JavaScript) inside of a directory called _next and there's no way to changes this, nor plans to implement a way to change it.
To get around this issue, you need to create an empty file called .nojekyll inside of your gh-pages branch. This will disable Jekyll's engine and will deploy your website as fully static HTML instead. The CLEAN property in the deployment action will ignore .nojekyll and CNAME, so they will not be deleted.
Oh yeah, and btw, if you have a custom domain, you may want to create a CNAME file for it.
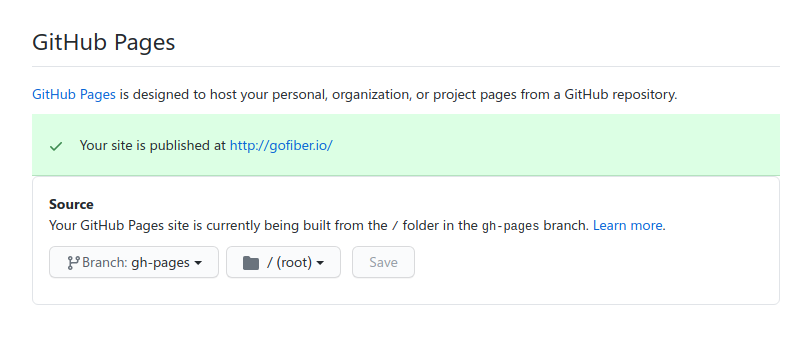
Once these steps are done, you can now enable GitHub Pages for the gh-pages branch in your repo's settings:
Troubleshooting
The CSS is gone...
If you don't have a custom domain attached to your GitHub Pages site, it will be served under username.github.io/repo. By default, Next.js assumes that your site is located at the root level of your domain, but in this case, it's actually located under the repo path. Luckily, Next.js offers us a way to get around this.
Create a file called next.config.js with the following contents (where you replace repo with your subpath):
module.exports = {
  basePath: '/repo',
  assetPrefix: '/repo/'
};
basePath specifies what is the base path of your application, to use for <Link> and other related things. assetPrefix specifies where your assets are located.
To improve local development experience, you might want to set these values depending on the environment you're working in:
const basePath = process.env.NODE_ENV === 'production' ? '/repo' : '';

module.exports = {
  basePath,
  assetPrefix: `${basePath}/`
};
The CSS is still gone/But I have a domain...
In case you have a domain or you've done the previous steps and the CSS is still gone, you probably forgot to create a .nojekyll file in your gh-pages branch. If you did do that, you should commit again so that the GitHub Pages runner will re-render your site without Jekyll.
Conclusion
In this post we could see how easy it is to deploy a static Next.js site to GitHub Pages using GitHub Actions. GitHub has surely evolved a lot in the past few years because everything in this tutorial uses tools made by GitHub, so we used the same product to host our website's code, create a static build of our website, and deploy it to the internet.